Meddle is a cross-version mod loader for Minecraft. It's designed to load low-level tweak mods, it doesn't actually do anything to Minecraft itself. It's intentionally simple, reducing the need for users to reinstall it as often for updates, and increasing compatibility over a wide range of Minecraft versions.
It was originally designed as part of a Minecraft 1.8 mod development platform and API that I was developing, but when 1.9 snapshots began to be released, it was separated and modified because I wanted to apply some tweaks to 1.9 to make it more enjoyable.
Due to the nature of Meddle, you can use it as a basis for modding Minecraft servers, while still allowing vanilla clients to connect. In fact, several of the Meddle mods available here can be run on just a server!
Through a combination of additional Meddle mods like DynamicMappings and MeddleAPI, mods can be created which are capable of adding more content than just tweaks, allowing for things like blocks and items to be added to the game.
Meddle and all of its associated software is also open-source.
Instructions for installing Meddle are available for both MultiMC as well as the vanilla Minecraft launcher.
Installing Meddle for MultiMC is fairly simple. Create a new instance for the game version that you want. Now right-click it, select "Instance Folder". From there, create a folder called "patches". Save the JSON file linked below into that folder. You're done!
MultiMC JSON: Meddle v1.3
MultiMC JSON: Meddle v1.2.2
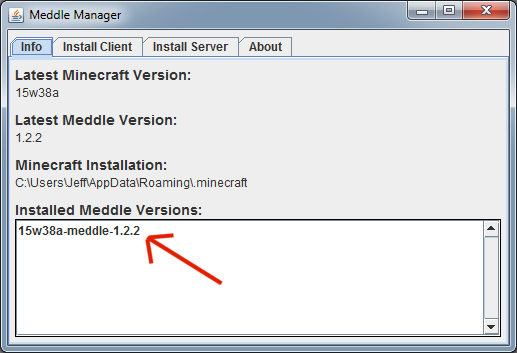
First download the new Meddle Manager application. When you run it, it should automatically be able to detect your Minecraft installation folder, and display info about the newest version of Minecraft available, newest version of Meddle available, and the versions of Meddle you have installed.
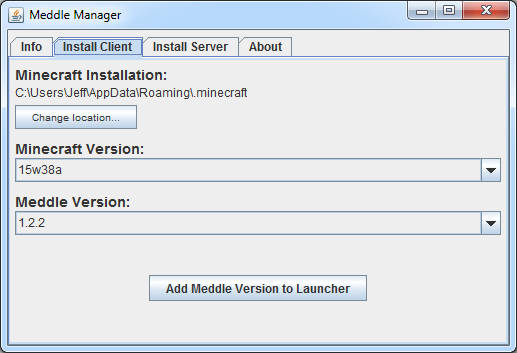
Go to the Install Client tab, select the Minecraft snapshot you wish to install Meddle for (usually the latest), as well as the Meddle version, then click "Add Meddle Version to Launcher".
When you go back to the Info tab, you should see the version you just installed displayed in the box.
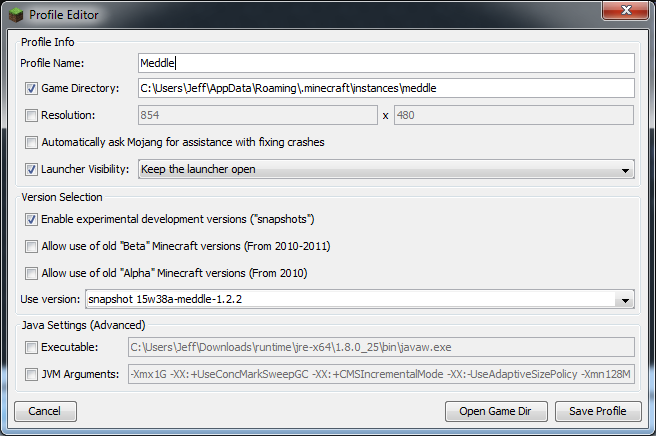
Now open or restart the standard Minecraft launcher. Click to add a new profile. Set the name, and optionally put it into a different game directory so that your saves and mods will be separate from your vanilla worlds. I highly recommend you disable "Automatically ask Mojang for assistance with fixing crashes" since they aren't responsible for any crashes Meddle might cause. You might wish to set Launcher Visibility to "Keep the launcher open" so that you can see if any errors occur during startup.
Select "Enable experimental development versions ("snapshots")". Now select the Meddle version you just installed from the version list.
You're done! Run the instance once so that it creates the necessary folders, then go into the "Game Directory" folder you picked, find the "meddle" folder it created (you'll also see "saves", "logs", "resourcepacks", etc), and drop your mods in.
Using the vanilla launcher is slightly more complicated and not quite as flexible. These instructions will describe using snapshot 15w44b with Meddle 1.3. If you need a different Minecraft or Meddle version, just modify the json url and instructions as necessary.
First, download the following .json file: Snapshot 15w44b with Meddle 1.3
Now find your Minecraft folder (Windows is %appdata%\.minecraft). Go to "versions". Make a new folder called "15w44b-meddle-1.3". Copy the json you downloaded from above into this folder.
Lastly, open the launcher (or restart it if it's open) and create a new profile using "15w44b-meddle-1.3" as the version. If it's not in the version list, make sure you have the box selected to enable snapshots.
The first time you run Minecraft with Meddle installed, a "meddle" folder will be created in the Minecraft instance folder. This is where you'll drop any mod jars. Some mods may also create config files in the "meddle/config" folder.
For servers, the process is automated. Download the ServerGenerator tool, then run it as follows:
java -jar servergenerator-1.0.1.jar <minecraft_version> <meddle_version> <destination_dir>
So to install Meddle v1.2.2 for snapshot 15w36c into a "server" folder, you would use:
java -jar servergenerator-1.0.1.jar 15w36c 1.2.2 server
This downloads all the necessary files, and would create a server jar named meddle_server.15w36c-1.2.2.jar. This is what you would run to start the server.
During snapshots, if you want to be able to stay up to date, you can keep the ServerGenerator tool in the same directory as your server, and simply use a period for the destination directory. You'll just want to make sure that you launch your server from the newly-created jar instead of the previous one.
Various mods can be used server-side-only if you wish, such as LeafDecay. Check the mod descriptions to find out which can be used in this fashion.
Note: There's currently a bug where output isn't being redirected to the graphical GUI, but still to the console. You can prevent the graphical GUI from showing up at all by adding "nogui" to the server command line, but there's a bug in Minecraft since 1.7.x which occasionally causes a crash on exit. I'll try to find a workaround to the former in hopes that Mojang fixes the latter.
Mappings are the translation table between the obfuscated/scrambled names that Mojang applies to the game upon release, translated by the community into something that's readable for a developer to know where they are inside of the game. They're a fairly crucial part of modding, but a laborious task to create. And since the obfuscation changes in almost every version of Minecraft that's released, even snapshots, this means you're chasing a constantly moving target.
Due to this, Meddle mods normally have to be updated for nearly every version of Minecraft to adapt to the name changes. I did this for the initial Meddle mods that I created for first few snapshots. But upon witnessing the rapid releases from Mojang, I knew something had to change. I wanted to actually play the game, not spend time updating the mods constantly.
The DynamicMappings mod was my solution to this problem. It's a Meddle mod which scans Minecraft at startup and creates this translation table automatically, regardless of snapshot version. This is far from a complete list compared to what modders are familiar with, however, since code has to be written to locate everything needed. But as I release mods, the available mappings only continues to grow, allowing for even more complex mods as things progress.
Despite the limitations, the immediate advantage of DynamicMappings is that most snapshot updates will work seamlessly with Meddle mods. When it doesn't, usually only DynamicMappings need to be updated, and everything will work again. Updating this one mod, versus updating multiple individual mods, is easier on everyone involved.
The most basic Meddle mod is simply a class that implements the ITweaker interface from Launchwrapper. The jar manifest should then point to this class using a TweakClass directive, which is exactly how you would do it with Forge as well. This allows you to create tweak class mods that can be compatible with both Forge and Meddle.
Meddle also has a @MeddleMod annotation, allowing you to specify certain metadata about your mod, including mod dependencies. If you're using DynamicMappings, it's recommended that you specify it as a dependency, but Meddle currently gives DynamicMappings priority automatically, for backwards compatibility with Meddle 1.1 mods.
(More info to come)
Note: All mods listed here require both the Meddle mod launcher as well as the DynamicMappings mod to be installed.
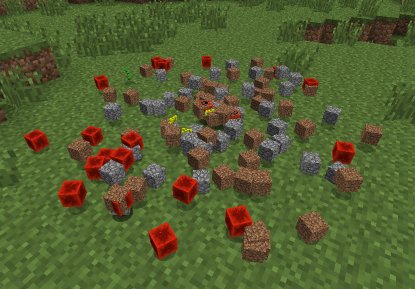
AllTheItems eliminates the vanilla behavior of combining items on the ground into item stacks.
Why would you possibly want to do that, you might ask? Well, a practical reason would be in testing a mod. But the more likely reason is for nostalgia, since this was the standard behavior in Minecraft 1.2.5 and earlier. There's a distinct difference in walking through a bunch of items and hearing the rapid item collection sound, as opposed to picking up a couple or so item stacks. Some people found the older method more rewarding when mining, which this brings back.
Note: This mod also has Forge versions, located on the Forge Mods tab.
1.9 Snapshots
AllTheItems v1.2.1
Requires: Meddle v1.2+, DynamicMappings 002+
1.9 Snapshots
BabyBuster v1.2.1
Requires: Meddle v1.2+, DynamicMappings 002+
BabyBuster v1.2
Requires: Meddle 1.2+, DynamicMappings 002+
Ever noticed how mobs seem to float a bit too much in the air when hit? That's because starting with Minecraft 1.8 Mojang changed mob movement to be server-side only. This reverts that change so that the client responds to movement again as well, restoring the original feel and responsiveness.
NOTE: There's a vanilla bug which this mod inadvertently emphasizes, where normally only a mob's shadow drops into the block below them, where as this mod results in mobs appearing to drop half-way into the block. It only occurs in certain situations.
Note: All mods listed here require the Meddle mod launcher, as well as the DynamicMappings and MeddleAPI mods to be installed.
Adds two config file options: to drop all blocks affected by an explosion, and to prevent item entities from being destroyed by explosions. Both are enabled by default. This mod can be run on just the server-side if you want.
Download v1.0 (requires Meddle v1.2.2+, MeddleAPI v1.0.5+, DynamicMappings 015+)
Allows control over which blocks Endermen can pick up. A direct Meddle port of this mod.
Download v1.0 (requires Meddle v1.2.2+, MeddleAPI v1.0.1+, DynamicMappings 006+)
Adds a backpack item with 27 slots. Craft it with leather around a chest. They can be renamed in an anvil. It's a simplified version of my Forge-based mod Just Backpacks.
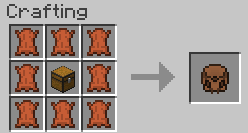
Note: This mod is very much still a prototype, it could lose items!
Download v1.0 (requires Meddle v1.2.2+, MeddleAPI v1.0+, DynamicMappings 005+)

AllTheItems is a simple coremod for Minecraft which eliminates the vanilla behavior of combining items on the ground into item stacks.
Why would you possibly want to do that, you might ask? Well, a practical reason would be in testing a mod. But the more likely reason is for nostalgia, since this was the standard behavior in Minecraft 1.2.5 and earlier. There's a distinct difference in walking through a bunch of items and hearing the rapid item collection sound, as opposed to picking up a couple or so item stacks. Some people found the older method more rewarding when mining, which this brings back.
As of v1.1, you can type /toggleitemgrouping into the console to toggle this behavior.
Note: This mod also has a 1.9 snapshot port for the Meddle mod launcher. See the Meddle Mods tab.
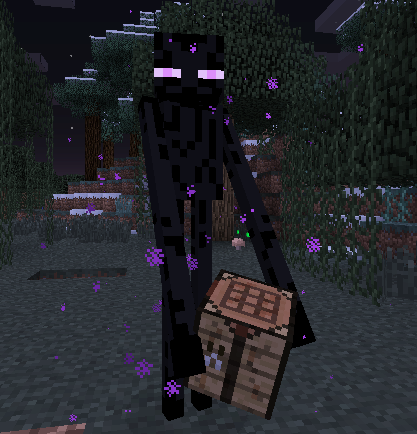
Endermanage allows you to control which blocks Endermen are allowed to pick up and carry. The config file allows three modes: pick up no blocks except the ones specified, pick up the default blocks as well as the ones specified, or pick up all blocks except for the ones specified.
The default mode is to pick up no blocks except those specified, which by default essentially means Endermen will not pick up any blocks until the config is edited.
In 1.6.4: Individual blocks and block ranges can be specified, including mod block IDs.
In 1.7.10: Blocks are specified by their string IDs. This can be found in the debug info in F3, or somewhere like the Minecraft wiki.
Please note that some blocks, especially mod blocks, could have unexpected results from being carried. They may simply not render, or could potentially even crash your game!
Remember that you can set your game to peaceful to temporarily remove all Endermen if necessary.
Note: This mod also has a 1.9 snapshot port for the Meddle mod launcher. See the MeddleAPI Mods tab.
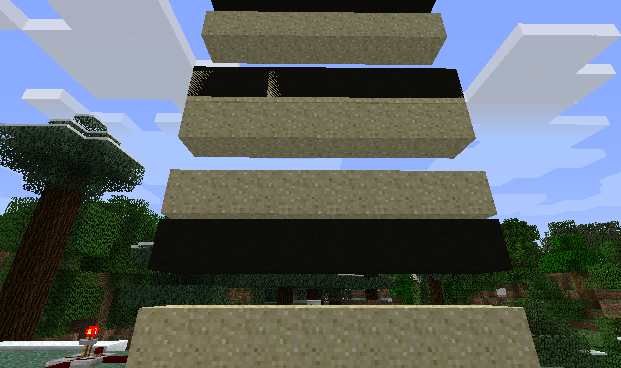
FallingFix is a tiny Forge coremod designed solely to reduce graphical issues related to falling blocks in Minecraft 1.4.7, particularly them turning black when the fall begins and ends.
The source of the problem is that the falling block entity is being rendered briefly before the regular block is removed from the world, and is still being rendered briefly when the fall is complete and after the block is placed into the world again. This results in the falling block entity obtaining a light level for that location in the world which is very dark, because a block occupies the space at those moments. This mod prevents the falling block entity from rendering when the in-world block exists.
To install, simply place into your "coremods" folder.
Flux Ducts adds a simple RF-compatible power conduit for use in Minecraft 1.8.
The Redstone Flux API has not been officially updated to Minecraft 1.8. This mod was created primarily for use with Progressive Automation, which includes its own updated version of the API. This may or may not be compatible with other RF mods which may become available, but will be updated to the official API once that's released.
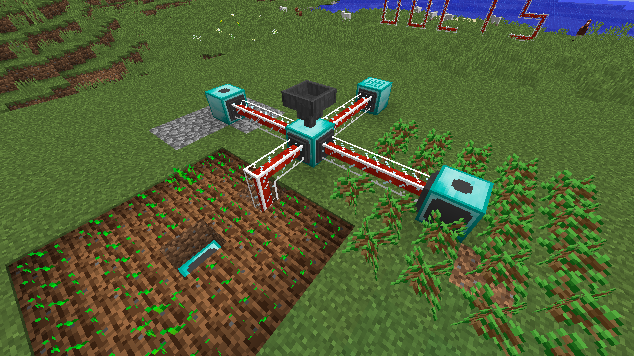
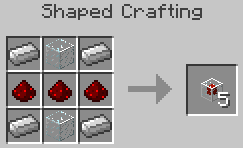
RF-per-tick is configurable via the config file, as is the number of ducts per crafting recipe. By default this is 320 RF/t, and 5 ducts per recipe.
This mod was developed based on the design provided by Gorstavich. If you were looking for RF conduits in 1.8, you should thank him for getting me to make it!
Q. What's this mod all about?
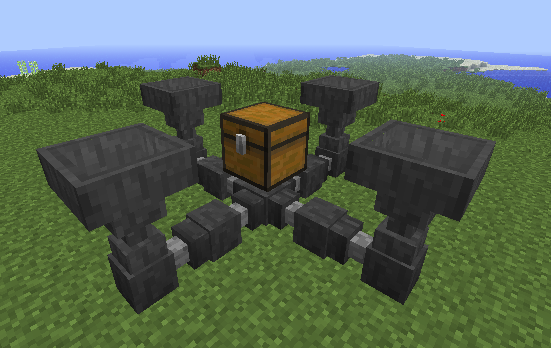
A. It's pretty simple. Hoppers can't transport items upwards. This mod adds ducts, which can attach to hoppers and send items in any direction. This mod also now adds Grated Hoppers, which can filter items.
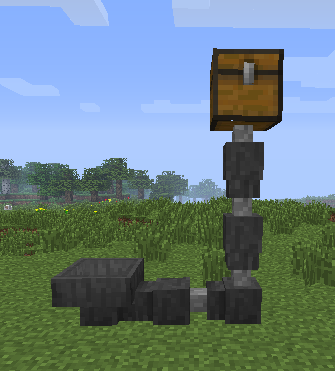
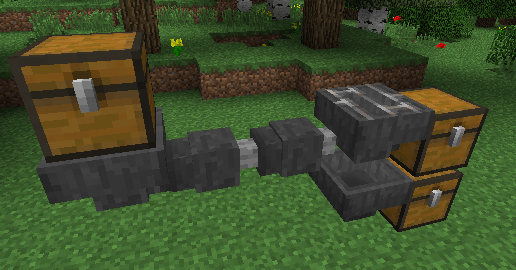
Q. What's the difference between a hopper and a duct?
A. A few things:
Q. Then what's a Grated Hopper do?
A. Grated Hoppers contain an extra row of items in their interface. This is the filter inventory. Only items matching this row are allowed into the hopper from a chest, hopper, or duct above it. The Grated Hopper will also only eject these particular items into its destination. Finally, it prevents a hopper beneath it from removing items matching the filter.
Items can still be inserted into the Grated Hopper from the sides and bottom which do not match the filter. This means that you can insert anything into a Grated Hopper, have it eject its matching items into its destination inventory, and then have regular hopper or Grated Hopper beneath it, pulling out the items which don't match the filter, to be directed elsewhere.
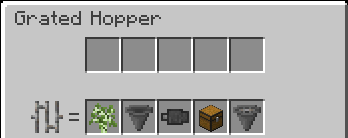
Q. What are the crafting recipes?
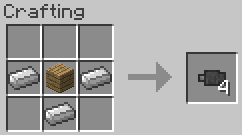
A. Hopper Ducts are a reduced version of the hopper recipe:
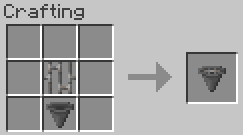
Grated Hoppers are a shapeless recipe:
Minecraft 1.8
Minecraft 1.7.10
Minecraft 1.7.2
Minecraft 1.6.x
Minecraft 1.5.2
This mod performs one basic function: to change the sky and fog color of the overworld or nether. For the overworld, it also removes the sun, moon, stars, and clouds. The command to do so is:
/skycolor [dimensionID] [r] [g] [b] <delay>
This color is saved to the loaded world, and transmitted to all connected players.
The dimension ID of the nether is -1, the overworld is 0. The R, G, B values can accept floating-point values, so anywhere between 0.0 and 1.0 is probably what you'll want to use, though you can go higher for a more fog-encroaching effect. The delay is optional, and is the number of milliseconds for the transition to complete. The default is 5000 (5 seconds).
To disable for a dimension, set any of the R, G, B values to be negative.
This mod was designed for use in the Infernal Skies modpack but you're welcome to use it wherever else you see fit.
Yes you read that right, Intermediary is a mod that bridges the gap between Minecraft 1.2.5 and 1.7.10. Or at least it tries to, because it's still at an experimental stage; many things are functional, but many other things aren't.
This is not meant for stable gameplay environments. It's riddled with bugs and unimplemented features. Don't use it on a good save game. There's a very high chance you'll do something to crash the game, possibly so badly that you can't reload the save without removing Intermediary altogether. You'll probably be playing around with it in creative mode for now anyways, so just use a new world. Or better yet, use a completely seperate Minecraft instance.
You'll probably want to have NEI installed (the regular 1.7.10 version), because not all blocks added will show up in the Intermediary creative menu at this time.
If you want to follow development of the project, you could look on my Twitter account, where I tend to post too many images and animations of my progress!
Q. How do I use it?
A. Drop the Intermediary mod JAR into your regular Forge mods folder. Run Minecraft once, and you should see a new folder appear in your Minecraft folder called "Intermediary". Inside there you'll find a new "mods" folder. This is where you put your 1.2.5 mods.
Q. How does it work?
A. Intermediary creates an abstraction layer for 1.2.5 mods which are attempting to access Minecraft, ModLoader, FML, and Forge. Mods believe they're running inside of 1.2.5. Many of the Java classes involved in this abstraction layer are simply empty dummy classes so that the mods will load. Others include behavior to translate actions between the two versions as accurately as possible, despite their sometimes significant differences. The only thing of Minecraft 1.7.10's that the 1.2.5 mods have direct access to is the OpenGL context.
Q. Didn't mods have block and item ID conflicts back then?
A. They sure did, and you get to enjoy that all over again! Mods will not have ID conflicts with 1.7.10 mods; they will however have conflicts with other 1.2.5 mods that you're trying to use. Most mod configs should end up inside of your "Intermediary" directory after you run them for the first time, so you'll be able to edit them from there to avoid any issues.
Q. Mods were separate for client and server in 1.2.5. How does that work now that the client and server are integrated?
A. Intermediary currently only uses 1.2.5 client mods. Functionality is transparently encapsulated and synchronized across the client and server, and works for things such as tile entities and containers. As far as the 1.2.5 mods are concerned, they're still running on a 1.2.5 client. This still results in synchronization issues with some things currently, however, such as item stacks, certain inventories, entity data, etc.
Q. Can I run this on a server?
A. Not currently, but this may be possible in the future.
Q. What mods work?
A. At this point, not many. And the ones which do work usually have a number of issues. Compatibility entirely comes down to me running a mod and then implementing the classes/fields/methods that a mod is trying to use.
Note: All are the client-side versions.
Please note that there are currently major GUI bugs which affect all mods running in Intermediary. This affects the player inventory as well when you have an Intermediary-based GUI open.
*PortalGun requires you to move everything from the inner "portalgun" folder into the root of the zip before it'll work, since it normally had weird installation instructions for the time, but can still work with Intermediary fortunately with this method.
**More Creeps and Weirdos requires you to take the MoreCreepsAndWeirdos.zip archive out of the main zip and use that in your Intermediary mods folder. Don't worry about the resources, they won't work right now anyway.
Build 008 - (primary) (backup)
Build 007 - (primary) (backup)
Build 006 - (primary) (backup)
Build 005 - (primary) (backup)
Build 004 - (primary) (backup)
Build 003 - (primary) (backup)
Build 002 - (primary) (backup)
Build 001 - (primary) (backup)
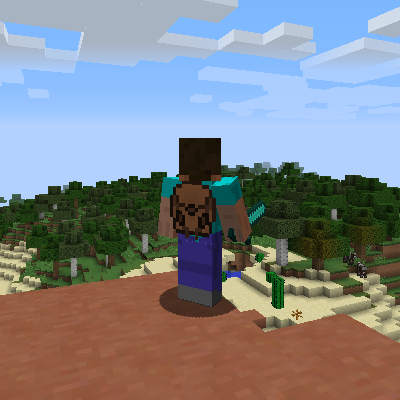
Just Backpacks adds four tiers of backpacks to help you on your journey. They can be named using an anvil, and colored with dye the same as with leather armor (and removed via a cauldron of water).

Backpacks must be worn on your chest inventory slot, and can then be accessed via the shortcut key (default is 'B', configurable in the game options).
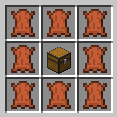
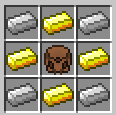
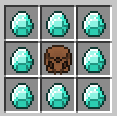
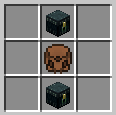
Please Note: If your tier 3 backpack contains items, you must empty it first before attempting to craft the ender tier.
Concept by Gorstavich, developed by FyberOptic.
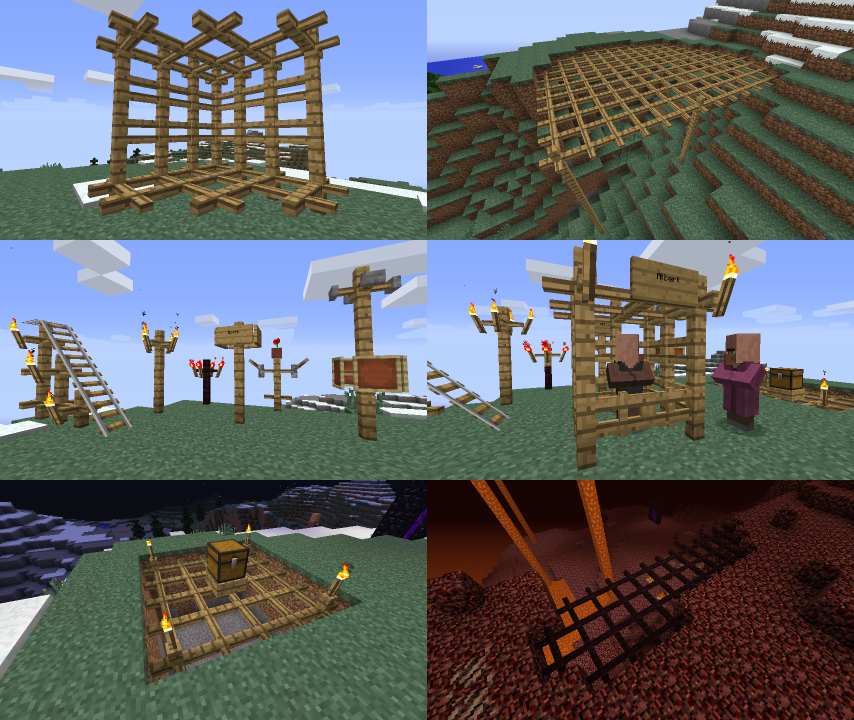
Ever wondered why Minecraft never included any kind of lattice blocks to walk on? So have I! This simple mod has got you covered.
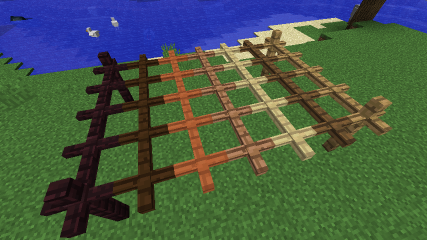
The lattice blocks are basic crossed segments of wood which are capable of interconnecting vertically with fence posts, as well as other configurable blocks, to achieve a wide variety of visual effects. They come in both the standard wood and nether brick forms.
The Minecraft 1.8 versions can do all of the variations of wood as well:
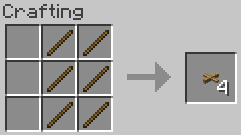
The recipes are basically the standard fence recipes turned on their side:
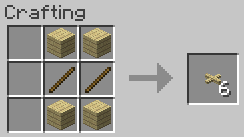
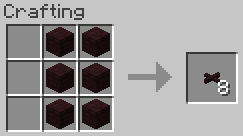
The config file allows modification of which specific blocks the lattice will connect with vertically, with the default including things like fences, torches, skulls, pressure plates, etc. From here you can also disable the default functionality of lattices interconnecting with one another, as well as enable them to automatically connect with any solid block above or below.
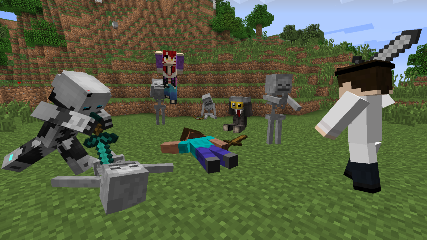
Model Citizens allows you to place player or skeleton character models into the world which can be fully posed, wear armor, hold items, and have a complete inventory that players can loot. You can use your own custom textures, or use the standard player textures uploaded to Mojang.
It was intended for custom maps where you want players to find items and lore on fallen heroes, but you can use it for pretty much anything!
Models can be spawned by using a Model Placer item, craftable using the recipe:
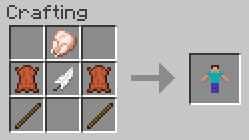
Crafting of the Model Placer can be disabled in the config if desired. Using a newly crafted Model Placer produces a Steve model by default, facing your orientation.
Right-clicking a model provides you access to its inventory. At the top left are standard armor slots, which will render on the model. The top right area will display the model's name. Below is a standard player inventory arrangement, with the bottom-left slot having a hand icon. Any object you place in this slot will render in the model's hand.
There's a config option available if you wish to disable the player's ability to place items back into the inventory in survival mode.
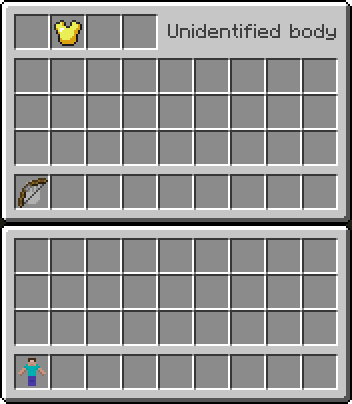
When invulnerability config option is disabled, models are weak against shovels, but are still invulnerable to explosion damage. This prevents accidental removal of important models (and their inventories) from your maps. When broken, the model drops its full inventory and optionally a Model Placer item (enabled by default). The item will retain its information and can be placed again in the world, with only its orientation changing when placed.
When in creative mode, using middle-click to pick the block will similarly duplicate a model, as well as its entire inventory. This allows you to quickly place many similar copies in the world.
To pose and customize a model, shift-right click its base with an empty hand while in creative mode to get its configuration GUI (can be disabled for players in survival mode via the config). There are several pages of settings. The initial page allows you to specify the model type (either standard or skeleton), and to enter a username to use for the texture. The other pages allow you to set the model's orientation.
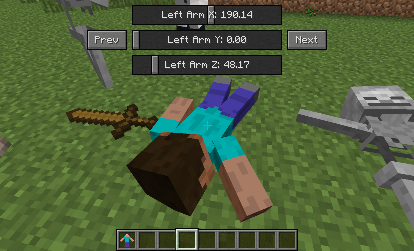
Using the mouse wheel in the configuration GUI will either flip through the pages or finely tune a slider control depending on what you're hovering over. Holding shift while doing this will adjust a slider even more precisely.
Right-clicking in the configuration GUI will toggle the controls up and down, allowing you to move it out of the way while posing it. Both the position and the page will be remembered if you exit the GUI, making it easy to pick up where you left off if you have to move your character for a better view while posing.
If you wish to use a different display name than the texture name, or want to use a default Steve or skeleton texture along with a custom name, then the exclamation mark can be used as a separator. Texture name goes first, then display name. Leave the texture name blank to use the default Steve or skeleton ones.
Model textures are searched for locally first, from within the config/modelcitizens folder. If not found there it will pull the standard model for that player from Mojang's servers. Your custom textures should be in PNG format, and the filenames all lowercase.
Minecraft 1.7.10
Ever noticed how mobs seem to float a bit too much in the air when hit? That's because starting with Minecraft 1.8 Mojang changed mob movement to be server-side only. This reverts that change so that the client responds to movement again as well, restoring the original feel and responsiveness.
NOTE: There's a vanilla bug which this mod inadvertently emphasizes, where normally only a mob's shadow drops into the block below them, where as this mod results in mobs appearing to drop half-way into the block. It only occurs in certain situations.
Minecraft 1.8
PhysicsFix v1.1
downloadThis was a requested mod that performs a simple function: hitting chickens with a sword enough times makes them angry, spawning in several of their friends to chase you down and attack you.
If this behavior sounds familiar to you, it's because this same thing happens in The Legend of Zelda series.
The "Angry Chicken" entity can also be created via a spawn egg if you're making a custom map or something.
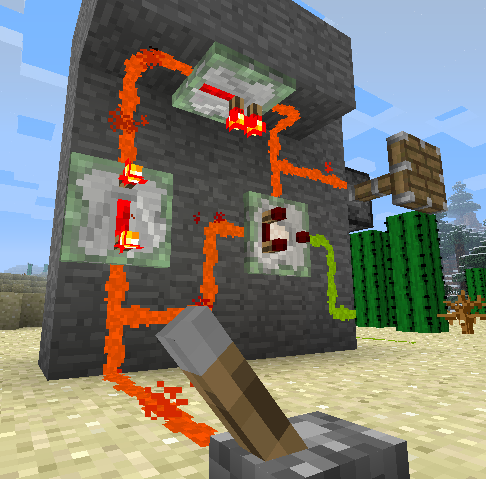
Redstone Paste Mod adds a new form of redstone dust into the game, allowing you to transmit redstone signals across a variety of surfaces, including ceilings and walls. Also included are sticky repeaters and sticky comparators, to keep your redstone current strong or do complex logic no matter where you decide to run your paste.
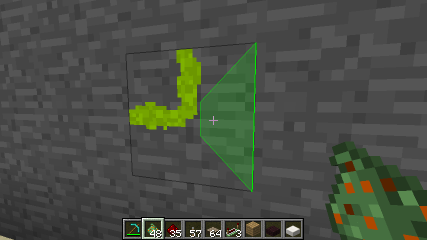
The placement of the paste is uniquely different than normal redstone, however. It can be applied to any of the four directions of a block face, allowing you to create compact redstone paths, and only direct current in the directions you desire. Individual segments can be removed by clicking them while highlighted, or you can remove the entire face at once by clicking the center area.
Holding the sneak key allows you to place both the segment you've selected as well as the one opposite. If sneaking when placing paste in the center area, it will place paste in all four directions of the face.
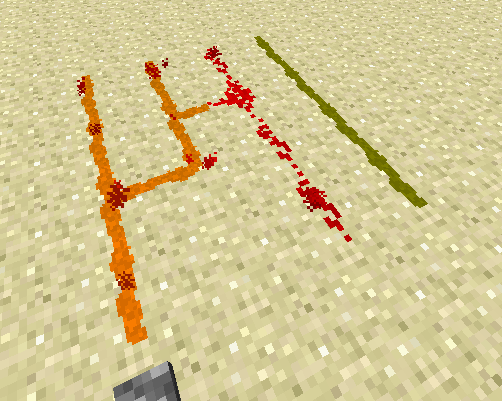
Paste can interact with dust when you explicitly connect to it. Otherwise it can run side by side without transmitting redstone current between them.
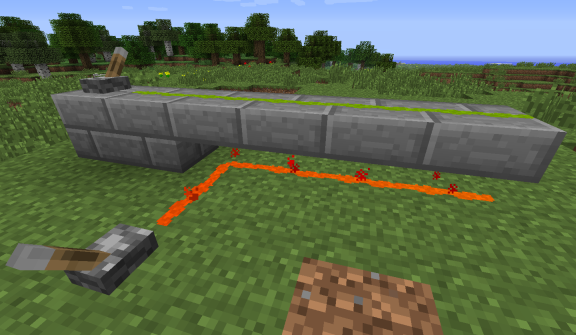
You can hide paste, sticky repeaters, and sticky comparators using half-slabs by right-clicking them while holding one. A ghost image of the slab will appear when it's possible to cover it. You can even place them vertically!
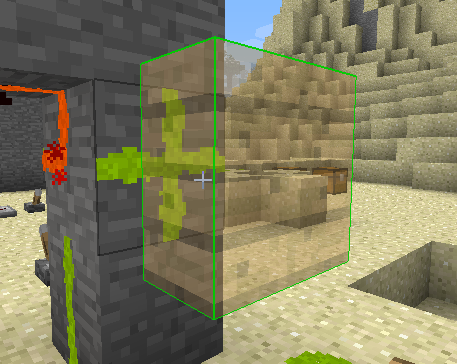
To remove it, simply break with your hand or any tool. Note that only one Redstone Paste object (paste, sticky repeater, sticky comparator) is allowed within a block space in order to be covered with a slab.
This feature works with slabs from any mod which derive from Minecraft's standard slab classes. Biomes O' Plenty is tested to be compatible.
Since the stone slab has a unique texture compared to stone blocks, it will instead take the appearance of a stone block when applied to paste to blend in better.
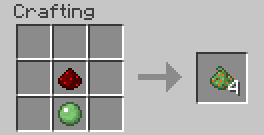
The crafting recipe is shapeless, consisting of simply a piece of redstone dust and a slimeball, yielding four pieces of paste. The config file allows you to specify how many pieces of paste the recipe gives, as well as providing an alternate recipe of a slimeball surrounded by redstone dust. You might wish to use these settings to better balance your game, depending on factors such as other mods you have installed, availability of slimeballs, or the intended focus of your game.
Sticky repeaters and comparators are equally simple to craft.
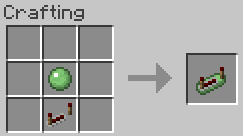
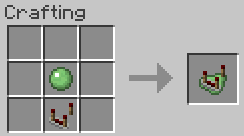
Minecraft 1.8
Minecraft 1.7.2
Minecraft 1.6.x
Redstone Paste v1.5
primary backup 1 backup 2Redstone Paste v1.4.3
primary backup 1 backup 2Redstone Paste v1.4.2
primary backup 1 backup 2Redstone Paste v1.4.1
primary backup 1 backup 2Redstone Paste v1.4
primary backup 1 backup 2Redstone Paste v1.3
primary backup 1 backup 2Redstone Paste v1.2
primary backup 1 backup 2Redstone Paste v1.1.2
primary backupRedstone Paste v1.1.1
primary backupRedstone Paste v1.1
primary backupRedstone Paste v1.0
primary backupMinecraft 1.5.2
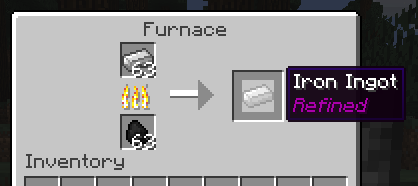
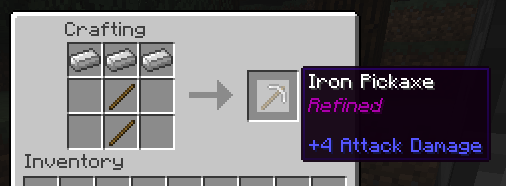
Simple Refinement is just that: a simple way to process your iron and gold into refined versions. To do so, simply run your ingots through a furnace again. You'll now notice the "Refined" tag on them, and anything you craft using all refined ingots will now also have this tag.
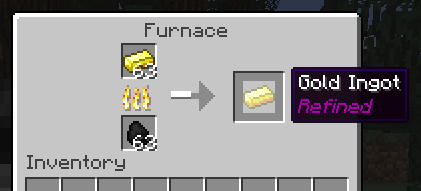
This mod adds no new items into the game. Iron is iron, gold is gold, no matter how refined it is. You can still mix and match refined ingots with regular ones in your crafting without issue.
Anything that you craft using all refined ingots also becomes refined. In the case of any tool, weapon, or armor, they gain a 50% bonus to durability. This may seem like a lot, but diamond is still more durable than refined iron, and refined gold will still be relatively poor. Refinement is not an enchantment, so you can still enchant your tools as well.
Note: All of these are jar mods. The client mods can be used with or without Forge. Simply add them to a Minecraft jar, or as a jar mod in the MultiMC instance settings.
ShiftNoActivate - Allows you to avoid activating blocks by holding shift while right-clicking, like newer versions of Minecraft do.
LavaDecayFix - Fixes lava to decay properly when the source block is removed, which also makes BuildCraft pumps work more reliably.
RetroLeafDecay - Makes tree leaves decay quickly, similar to FastLeafDecay. Server versions are only required on the server, not client.